Some Like It Hot
 New addition for the metal casting in my shop. An electric powered metal melting furnace.
I have always use an air/propane turbo torch to melt silver, brass, bronze for my investment castings. The torch works fine for small amounts in the 20–30-gram range. I have melted as high as 70 grams, but the process gets much more difficult.
The open puddle of liquid metal loses heat rapidly. I must follow the melt (in a crucible) from my heating area to the mold flask with the torch constantly “playing” on the melt puddle. It’s a two-hand operation with the torch in my left hand and the crucible (clamped in holding-tongs) in my right hand.
The pour is single handed into the top of the mold flask. A growing issue is my (PN) Peripheral Neuropathy sometimes gives me a bit of hand quiver if I do not consciously try to relax my right arm.
I like to do larger pours with larger projects. A few days ago I cast a 60 gram melt of silver for a small bell. Before that I did a large ~200g melt of brass for a solid brass gnome figure. Both jobs pushed my personal comfort limits for torch melting and pouring.
Casting 1700-2000 degree metal is nothing that one should feel difficult or uncomfortable performing.
I must be completely in control of the casting operation. The transfer process from the melt to the pour stage with heavier and larger volumes has begun to exceed my comfort zone.
I considered the melting furnace since day one. However, the volume of the metal for my jewelry work has typically been small. Nothing that a torch could not handle comfortably. Time and old age alter my comfort zones. Now is the time to stop considering and act. Ha!
RioGrande, my jewelry tool and materials supplier, offers several Italian made models of melting furnaces. However, the 1kg (gold melt) capacity furnace with a purchase cost of over $650 has always been a deterrent. The larger sizes are up to $950. A cost not justified for my needs.
Amazon has a huge selection of similar Chinese made melting furnaces. Some under $300. I choose a 1kg capacity furnace (shown) with a little higher wattage than others. I leave my selection reasons there as I am not making recommendations on brands and models. Reasonable cost was the major decision factor.
A closed chamber electric melting furnace with digital temperature control provides a far improved melt environment. Metal is not overheated and far fewer contaminates are introduced to the melt. The crucible is graphite which adsorbs oxygen.
Pour timing is less critical as the metal remains liquid a bit longer between the melt and the actual pour. I can use two hands (if needed) between the melt furnace and the mold flask pour point.
I believe small single item castings will continue to be more practical using the torch melt system. It is quicker than heating a 1kg (about 500g for silver) capacity electric furnace for a 25-gram casting. A load that small is almost lost within the crucible.
I will understand the process method balance once I have a chance to use my new melt furnace. One thing I know for certain. I will be far more comfortable with larger loads with the furnace. Perhaps small loads will be no problem at all… just longer to melt than the torch.
Lost Resin Casting
 Several years ago, I began experimenting with using 3D printing to produce the master models needed for investment casting. Fused Deposition Modeling (FDM) is one 3D printing process that extrudes thermoplastic in layers. One plastic, Polylactic Acid (PLA) will burn out of the mold. But the layers are large, and the resulting model and casting looks very poor.
Another form of 3D printing uses a Ultraviolet light sensitive resin. The printer uses “pictures” of each layer and the layers are extremely thin and near invisible in the resulting print and casting.
Resin 3D printing is by far the best choice. Resin designed for burn out casting is easily available. My first choices for making casting models were to use the lowest cost resins. I tried four brands, all with very limited success.
I eventually determined I didn’t have the “right stuff” in either skills, equipment or materials. So, I returned to using carved wax for casting. 3D printing for casting was put on hold.
Since then, I have obtained a new, more powerful, resin 3D printer. I made the decision to try printing casting models again, but using professional grade castable resins.
BlueCast
Sometimes, when I desire to play a serious game, I must pay the entry fee. BlueCast is an Italian producer for a product line of castable 3D printer resin. It has a reputation for high quality and one if not THE highest purchase costs.
As I said above, it’s been several years since I first desired using 3D printing to create the master (casting) models for use in investment metal casting. Investment casting is the process used in jewelry and other high detail casting commonly known as “lost wax casting” -- when the model is made from wax.
It is an all-in-one-piece molding process where an exact model is created using material that can be completely disintegrated and vaporized in a high temperature kiln firing. The model is surrounded by wet investment (plaster like material) in a steel tube called a flask.
The high temperature kiln firing destroys (melts/vaporizes) the model and cures the investment into a hollow ceramic mold. The empty cavity the vanished (lost) model created is then filled with the hot molten metal.
The investment mold must be destroyed after the metal solidifies, to remove the cast metal duplicate of the model. The investment mold is therefore also “lost”.
To make another part, a new model and mold must be created again, to be destroyed (lost) to the casting process. It’s how it is done. A new model and new mold every time.
Using a 3D printed model for the expendable investment master model, is a huge time benefit for making investment cast duplicates. For this reason, almost all the professional investment jewelry casting is now done using 3D printed master models. This provides a direct path from the CAD (Computer Assisted Design) drawing to finished cast item.
A professional (commercial) caster cannot risk unpredictable or undependable processes and materials. Neither can the hobbyist. Bluecast resins are considered reliable professional grade material and justifies the cost. I am a hobbyist caster and can produce professional grade results using the correct materials.
AS mentioned, I have experimented with lower cost castable 3D resins with mixed results, especially with the kiln burn-out of the resin material. I had some success, but the typical issue was damage to the mold interior from the resin model burn-out. Thirty hours of production time is lost from a damaged mold, unseen until after the metal was cast.
Using wax master models, my successful cast rate is 99%. Resin model success has been less than 50%
I tried all the tips and tricks to get the low-cost castable resins to burn out clean. There are a great number of variables. The requirement is consistent dependable results. Couldn’t get there from here.
Now I have a more powerful printer and “paid the piper” for the “good stuff” resin and will see if it works for my needs and my print system, an Anycubic Photon Mono SE.
Step One
The first Bluecast X5 print was a success using the printer settings published on the Bluecast website. The next step is to cast this first model and see how the burnout behaves.
Step Two
The investment cast of the first Bluecast resin model in silver is also a success! Model and mold are of course “lost”, but the tangible result is a perfectly useable silver duplicate of the resin model.
Resin (material) costs are six times higher than the bargain-brand material, but in total production time and cost, the effect on product end cost is completely justified and not an issue.
Off to a good start. I have a good feeling I have a workable system. I will be doing many more resin model investment casting projects.
 |
 |
| First BlueCast X5 (resin) print just finished | Closer look at print on the build plate |
 |
 |
| This n is the un-UV-cured print after clean-up. Good detailed print. | UV after-curing fades out the blue color. This step is unnecessary if no sanding, filing or drilling is necessary. |
 |
 |
| After casting and pickeling. Very good burn-out. | Finished pendant. Note the fine detail. |
Unleashing My Inner Artist
 I committed to some computer tech. A Huion KAMVAS Pro 16 graphics drawing tablet. It’s a computer screen upon which I can draw. It’s like an iPad but is tied to a computer. It’s larger (16”) with more available features and applications. It functions like an iPad but must be tied to a separate computer like a monitor.
I wanted to do this for years. I have a Wacom Bamboo pad, but one has to look at the computer screen as the hand is drawing on a small area of the desktop. I prefer the pen-on-screen iPad experience and that is how the KAMVAS pro operates.
My new 12 processor Intel-NUC10 4.7 GHz computer should be a good match. Well, that’s to be seen. I am sure the speed/quality of the connected computer affects the drawing experience.
One of my goal applications for the drawing tablet is with Pixologic Z-Brush. I bought Z-Brush so I could design 3D models like sculpting clay. I have produced a few examples using the mouse and the Wacom Bamboo while looking at the monitor. A 16 inch draw-on screen is going to be a huge improvement in fun and comfort.
I am also itching to do all the other graphic things a graphic tablet can do. It may bring back the drawing and painting artist in me. The Senior Dan Kautz, my grandfather, taught me some of what he knew and I produced several water colors. My son has one in his home. But I never took the time to fully get involved. That was fifty years ago.
I use the Bamboo for photo editing with Adobe. That is another one of the good applications. The Bamboo still works but is no longer supported by Wacom. I think mine is at least a decade old. And it is small and so are the hand drawing movements. The 16" Kamvas Pro should be a great upgrade.
I will receive it next week and will be posting more here.
Pixologic,Inc. ZBrush
 Fired up my copy of ZBrush software a few days ago. I bought the full version 2, maybe 3 years or so back. Gosh, maybe longer? Time files. Kept it up to date and have “played” with it from time to time. I also bought a Bamboo Wacom pad way before ZBrush to compliment Adobe Photoshop editing process. The Bamboo is also nice to use for ZBrush editing. The Bamboo pad is now at least two versions out of date. Still works.
The professional work done in ZBrush is mind blowing. (Example shown is drawn art, not a photograph) I do not aspire to reach that level. Only possible if that was the only thing I like to do. It’s not.
I do like the organic art that can be produced in ZBrush. I want to use it for 3D print models that are well…, more organic.
ZBrush is a two dimensional graphic arts program that added a third dimension (The Z in ZBrush). The user interface is like the rambling old houses in New England (USA) that just have one addition after another added. Sometimes one has to go through the kitchen to reach the bathroom.
The interface can be learned but it is not an easy task. A lot of “shortcut” keys are available and many times a “tool” or “brush” can be found in several different locations. The interface is extremely configurable to the users preference and that too makes it much more complex.
As I mentioned the artwork produced by professional users is inspiring as it is intimidating. I can only guess at the time spent on the vast displays of what has be done within ZBrush. I am sure these artist may also use the ultra-expensive software like Autodesk Maya, one of the top rated. There are literally dozens of others. This is not a review of all options. Just my experience with ZBrush.
The good/best 3D graphic programs are very expensive and equally complex. Not intended for the non-committed artist and casual user hobbyist. Me.
There are reasonably good free software as well. Blender is one. I just explored the Blender application once again. I had “looked” at Blender a quite a few years ago in Linux and have noticed recent reports that Blender has now vastly improved in the last few years. The sculpting section looks and works almost exactly as Zbrush. I will say it looks like an excellent “free” starting point. Perhaps all that is needed.
ZBrush interface is based on a clay-like sculpting environment. That is what attracted me to the program. ZBrush is also highly “slanted” to the 3D printer printing artist, and that too is an attraction. Many “tools” included with ZBrush are intended to help the 3D print artist.
ZBrush has hard surface tools as well as the sculpting. It is also very good at color application and surface finishing. It just requires a huge commitment of time to master all the tools available. “All tools” is probably a very distant goal.
One fairly serious issue for the engineer in me is the total lack of measurement (dimensional) tools in ZBrush. It is foremost an art program, not CAD software. All sizing is by “eyeball” not ruler. There are tricks, like a drawn ruler, created in a CAD program and imported into a work-in-progress for reference. ZBrush is an “Art” program, not a substitute for CAD. However, both can be used together.
An .stl or .obj (and other) files can be imported into ZBrush for additional “organic” style editing. A basic dimensional base of correct size, then use ZBrush to add organic style decoration. This is one of several ways I see myself using this graphic tool. Not dimensional engineering, but applying organic details.
Many ways to work with almost unlimited options. It may be this freedom that is intimidating to a beginner like myself.
The Zbrush application is sure to pop up in future posts, especially when I have produced something worth printing. Probably before I have something worth printing… Ha!
Back to the Wax
Feeling frustration over the huge mountain of low value plastic JUNQUE I have printed has moved me back to my previous passion of wax carving and lost wax casting durable silver items.
I have made a very serious attempt to use 3D printing to create masters for use with silver casting. Much of that effort is shown here is this "lost wax" category. The inherent layering and complex chemical reactions in the casting and burn out proved to be far too complex for the results obtained. Some success, but several magnitudes of effort over the pure lost wax carvng process. The variable results were far from dependable or as consistant as wax.
The use of wax is also a complex process but provides extremely dependable results every time. The movie shows the CNC milling of the wax.
I developed some good CAD skills in designing 3D printed items. The very popular Autodesk Fusion 360 (F360) was the starting point for this project. But not the only software tool used. Vectric Aspire provides a very comfortable, easy to use, double side and 4th axis milling CAM. Aspire was used in this project as well as F360.
Not used here but I should mention another CAM that is good for CNC milling 3 and 4 axis. a product from the Netherlands called DeskProto. I own the hobbyist multi-axis version 7. Not an intense CAD as F360 or Rhino, but a get-the-job-done for CAM
This is about milling wax and silver casting a KAUTZ key fob with an owl design.
I originated the design using Fusion360. Creating the tag shape and size. The KAUTZ lettering was done in F360.
I used Aspire to create the owl, then imported the owl into F360 as a .dxf file. The complete CAD design was finished in F360.
Finally, I exported the key fob file as a stereolithographic (.stl) file and made a single 3D print in black plastic.
I returned to Aspire and imported the key fob as a 3D model (the .stl file) and used the Aspire double sided CAM to locate the key fob model in the middle of my wax carving block. Then I exported two CNC gcode files, one for each side of the wax block. The carving would be accomplished using a tiny 0.005 inch tapered end mill in my Taig milling machine, to which I have installed a 25,000 RPM water cooled spindle.
Three key fobs were carved from the wax requiring six milling operations. Two per key fob, once on each side. Run times were about 90 minutes per side.
The wax carvings were then cleaned up manually and sprued together for a single, all at once, casting.
The wax masters were invested (surrounded) with a plaster like material in a steel sleeve called a flask. Investment set-up was about 3 to 4 hours. Then the flask was placed into a kiln for firing.
Firing is a staged process. 300 degrees to let the wax melt out, then slow rise to 1350 degrees and held for the three hours burn out. Next the temperature is permitted to drop to 900 degrees where it remains until casting. It is a 12 hour process of firing.
The silver is melted by torch while the flask has a vacuum pulling on the investment from the bottom side opposite the pouring side. The actual cast (pouring) is just a second or two long. This cast required about 86 grams of silver, about $52.00 at my cost. Some silver will be recovered from the cut off sprue and used in the next cast.
After quenching the very hot flask in cold water, the cast silver is freed from the investment. The hot quench literally blows the investment into a fine slurry, freeing the cast. It makes a very exciting rumbling boiling sound. An exciting part of the process.
The silver is almost black from fire scale (oxidation) coming straight from the quench. Remaining investment is cleaned off the casting by hand (toothbrush) and by ultrasonic cleaning.
Then the casting is put in a hot water/acid “pickling” bath for about 30 minutes. The black fire scale turns to bright white which is the natural color of pure silver.
The sprue is cut off and hand finishing progresses from here. Filing, then polishing the silver to a mirror like shine or multiple other finish options. One of my favorites is blackening the background with a sulfer based acid. I have also used fired glass enamel which is another complex process of its own. These tags are polished up shiny and will develop an aged silver patina from use.
Final step was a couple of hours in the steel shot tumbler which burnishes and creates a hardened surface.
This is an example of my custom work. As I think I have shown, it is a very complex multistep process.
The value of silver is an easily priced commodity. There are many other consumable materials that add to the cost and value. Such as the wax and investment and electrical power needed to run the kiln. Tools wear out and require replacement. I try to make more than a single item at a time to share consumable costs.
The three tags are worth at least $150 retail, $50 each. They are one of a kind (well, three of a kind) and are custom made. Solid Sterling silver makes them much more intrinsically valuable than the single copy 3D printed in plastic. At least I think so…
 |
 |
| Original design 3D printed black plastic 150 uM layer height | Design CNC machined in Green casting wax, double sided |
 |
 |
| Comparision of 3D print and Wax Master model. | Three tags double side, milled in wax, and sprued for casting in silver |
 |
 |
| Tags inside steel flask. Ready for investment | Flask filled with investment. Next step 1350 degree 12 hour firing in kiln. |
 |
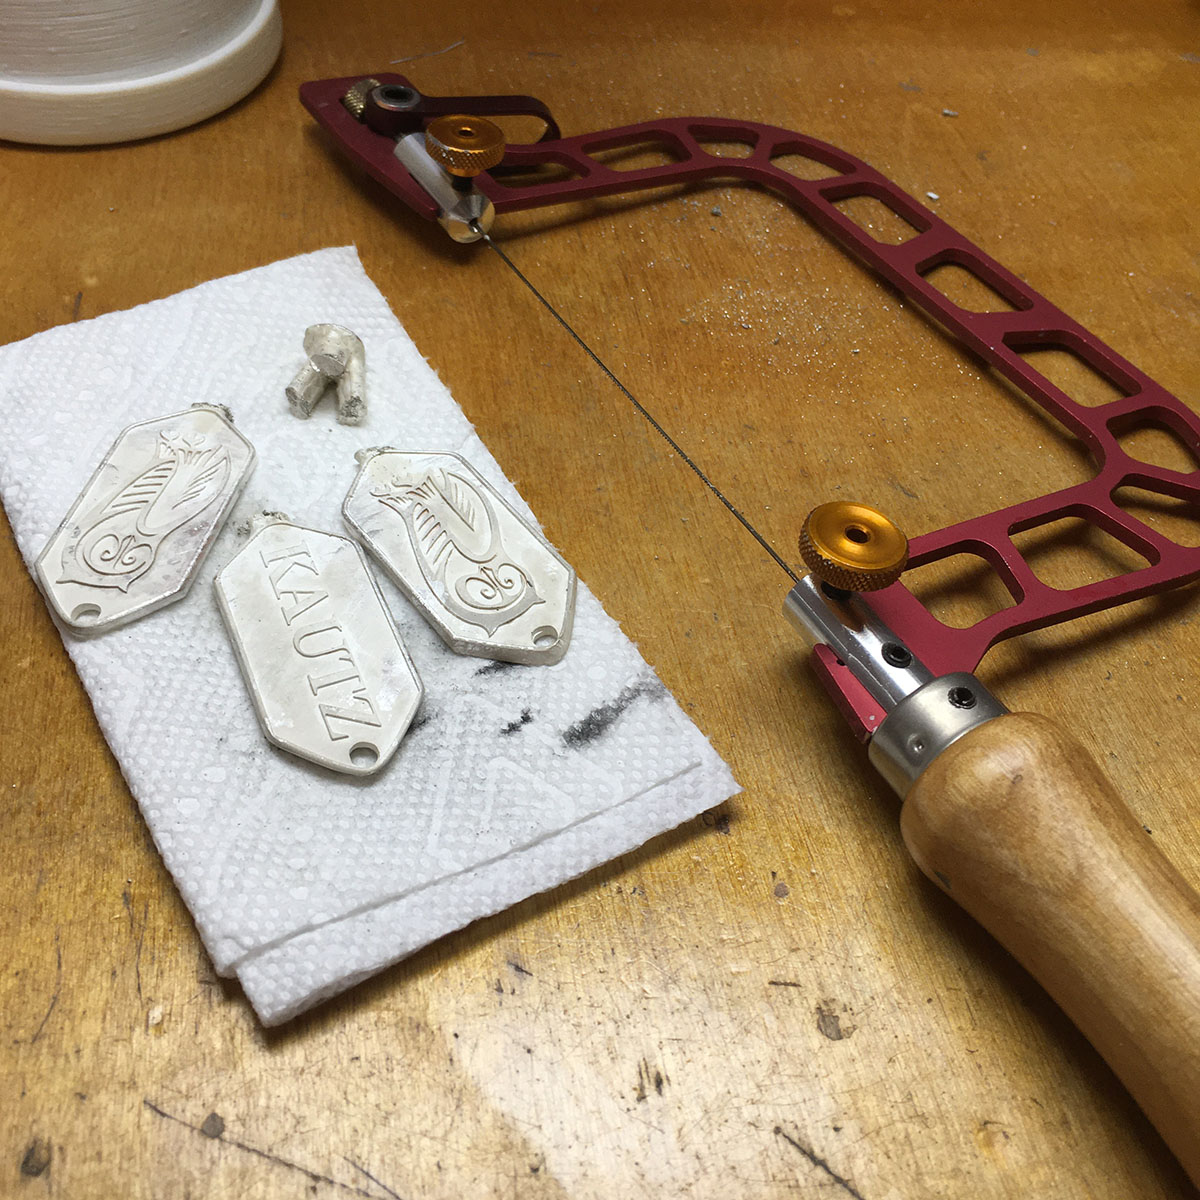 |
| Castings out of flask and after initial "pickeling" in mild acid. | Tags cut from sprue using jewelers saw. |
 |
|
| Tags finished with high polish! |