Wax Rocks!
 Not as a mineral but as a form of music. Ha!
There are some folks who actually make waxed rocks.
However, I am referring to wax used for lost wax casting.
There are many kinds or formulas of wax. There is one group of waxes that has be engineered especially for making master models for use in casting of metals. Casting wax.
In that group there is a wide range of characteristics for color, hardness, formability, strength, machinability, hand carving, injection molding. flexibility, melt point… The list is quite long.
The one thing they all must have is the ability to melt and burn out very cleanly in the burn-out process. While not damaging the internal mold surface.
The lost wax casting process is ancient technology. Know and used for over six thousand years of human history. Certainly not starting with the wax formulas in use today. But there has been a great amount of time to create casting wax with superior characteristics.
Materials other than wax can be used to create the casting models. I have experimented with 3D printing resins with some success.
Anything that will burnout and literally vaporize from the heat of the kiln can be used. I know insects and plant material have been used. It must not leave an ash residue or damage the mold. Clearing actions can be taken in some processes if the mold and sprue is large enough to allow blowing out the debris.
Wax is used in a large scale industrial casting process where a ceramic shell is formed over a (usually hollow) wax master. My process is for much smaller detail casting using a plaster-like investment mold-process used by dentist and jewelry makers.
I think wax really excels (rocks) as casting master material because of several reasons.
First because it burns out so cleanly and investment (the mold material) has been specifically designed to handle the wax.
Second is many forms of the wax are extremely easy to machine and carve with tools. I love both CNC machine carving and hand tool carving. What is shaped in wax is exactly what is produced in the metal casting.
Wax can be sanded and polished for an excellent surface finish before casting. The casting is only as good as the finish on the model
Wax can also be liquid injection molded into rubber molds for making many exact duplicates. More on that in a future post.
The most important feature of wax carving is that it can be additive as well as subtractive. Wax melting points can be engineered. Wax can be built-up as well as carved away. Cool melt wax can be applied to the surface of higher melt wax with a heated tool to add detail or make repairs.
The various creative methods available with totally workable material such as wax makes it the near-perfect material for casting. I love working and creating with casting wax.
All the carving and forming work is lost in the casting process. But as mentioned, there are ways to duplicate a design using rubber molds and wax injection. The wax is always lost, but the design CAN be duplicated if desired.
Sand casting, flexible rubber molds and other processes for casting have their place. They generally preserve the master model. Meaning it is not destroyed in the process. A lot of advantage in not loosing the model.
The prime advantage to lost wax investment casting is the extremely fine detail like filagree that can be captured and presented in the produced casting. Perfect for making jewelry, (teeth), and other super fine detailed parts.
It should be obvious, I love working with casting wax.
It is only one step in a creative process of casting metal. It is the step where, starting with a block of wax, all the shape or form changes from design to tangible model of the intended casting.
Dozens of videos exist on the process. So no details necessary here. Search “lost wax casting”. More info than I can post here.
Lost Resin Casting
 Several years ago, I began experimenting with using 3D printing to produce the master models needed for investment casting. Fused Deposition Modeling (FDM) is one 3D printing process that extrudes thermoplastic in layers. One plastic, Polylactic Acid (PLA) will burn out of the mold. But the layers are large, and the resulting model and casting looks very poor.
Another form of 3D printing uses a Ultraviolet light sensitive resin. The printer uses “pictures” of each layer and the layers are extremely thin and near invisible in the resulting print and casting.
Resin 3D printing is by far the best choice. Resin designed for burn out casting is easily available. My first choices for making casting models were to use the lowest cost resins. I tried four brands, all with very limited success.
I eventually determined I didn’t have the “right stuff” in either skills, equipment or materials. So, I returned to using carved wax for casting. 3D printing for casting was put on hold.
Since then, I have obtained a new, more powerful, resin 3D printer. I made the decision to try printing casting models again, but using professional grade castable resins.
BlueCast
Sometimes, when I desire to play a serious game, I must pay the entry fee. BlueCast is an Italian producer for a product line of castable 3D printer resin. It has a reputation for high quality and one if not THE highest purchase costs.
As I said above, it’s been several years since I first desired using 3D printing to create the master (casting) models for use in investment metal casting. Investment casting is the process used in jewelry and other high detail casting commonly known as “lost wax casting” -- when the model is made from wax.
It is an all-in-one-piece molding process where an exact model is created using material that can be completely disintegrated and vaporized in a high temperature kiln firing. The model is surrounded by wet investment (plaster like material) in a steel tube called a flask.
The high temperature kiln firing destroys (melts/vaporizes) the model and cures the investment into a hollow ceramic mold. The empty cavity the vanished (lost) model created is then filled with the hot molten metal.
The investment mold must be destroyed after the metal solidifies, to remove the cast metal duplicate of the model. The investment mold is therefore also “lost”.
To make another part, a new model and mold must be created again, to be destroyed (lost) to the casting process. It’s how it is done. A new model and new mold every time.
Using a 3D printed model for the expendable investment master model, is a huge time benefit for making investment cast duplicates. For this reason, almost all the professional investment jewelry casting is now done using 3D printed master models. This provides a direct path from the CAD (Computer Assisted Design) drawing to finished cast item.
A professional (commercial) caster cannot risk unpredictable or undependable processes and materials. Neither can the hobbyist. Bluecast resins are considered reliable professional grade material and justifies the cost. I am a hobbyist caster and can produce professional grade results using the correct materials.
AS mentioned, I have experimented with lower cost castable 3D resins with mixed results, especially with the kiln burn-out of the resin material. I had some success, but the typical issue was damage to the mold interior from the resin model burn-out. Thirty hours of production time is lost from a damaged mold, unseen until after the metal was cast.
Using wax master models, my successful cast rate is 99%. Resin model success has been less than 50%
I tried all the tips and tricks to get the low-cost castable resins to burn out clean. There are a great number of variables. The requirement is consistent dependable results. Couldn’t get there from here.
Now I have a more powerful printer and “paid the piper” for the “good stuff” resin and will see if it works for my needs and my print system, an Anycubic Photon Mono SE.
Step One
The first Bluecast X5 print was a success using the printer settings published on the Bluecast website. The next step is to cast this first model and see how the burnout behaves.
Step Two
The investment cast of the first Bluecast resin model in silver is also a success! Model and mold are of course “lost”, but the tangible result is a perfectly useable silver duplicate of the resin model.
Resin (material) costs are six times higher than the bargain-brand material, but in total production time and cost, the effect on product end cost is completely justified and not an issue.
Off to a good start. I have a good feeling I have a workable system. I will be doing many more resin model investment casting projects.
 |
 |
| First BlueCast X5 (resin) print just finished | Closer look at print on the build plate |
 |
 |
| This n is the un-UV-cured print after clean-up. Good detailed print. | UV after-curing fades out the blue color. This step is unnecessary if no sanding, filing or drilling is necessary. |
 |
 |
| After casting and pickeling. Very good burn-out. | Finished pendant. Note the fine detail. |
Back to the Wax
Feeling frustration over the huge mountain of low value plastic JUNQUE I have printed has moved me back to my previous passion of wax carving and lost wax casting durable silver items.
I have made a very serious attempt to use 3D printing to create masters for use with silver casting. Much of that effort is shown here is this "lost wax" category. The inherent layering and complex chemical reactions in the casting and burn out proved to be far too complex for the results obtained. Some success, but several magnitudes of effort over the pure lost wax carvng process. The variable results were far from dependable or as consistant as wax.
The use of wax is also a complex process but provides extremely dependable results every time. The movie shows the CNC milling of the wax.
I developed some good CAD skills in designing 3D printed items. The very popular Autodesk Fusion 360 (F360) was the starting point for this project. But not the only software tool used. Vectric Aspire provides a very comfortable, easy to use, double side and 4th axis milling CAM. Aspire was used in this project as well as F360.
Not used here but I should mention another CAM that is good for CNC milling 3 and 4 axis. a product from the Netherlands called DeskProto. I own the hobbyist multi-axis version 7. Not an intense CAD as F360 or Rhino, but a get-the-job-done for CAM
This is about milling wax and silver casting a KAUTZ key fob with an owl design.
I originated the design using Fusion360. Creating the tag shape and size. The KAUTZ lettering was done in F360.
I used Aspire to create the owl, then imported the owl into F360 as a .dxf file. The complete CAD design was finished in F360.
Finally, I exported the key fob file as a stereolithographic (.stl) file and made a single 3D print in black plastic.
I returned to Aspire and imported the key fob as a 3D model (the .stl file) and used the Aspire double sided CAM to locate the key fob model in the middle of my wax carving block. Then I exported two CNC gcode files, one for each side of the wax block. The carving would be accomplished using a tiny 0.005 inch tapered end mill in my Taig milling machine, to which I have installed a 25,000 RPM water cooled spindle.
Three key fobs were carved from the wax requiring six milling operations. Two per key fob, once on each side. Run times were about 90 minutes per side.
The wax carvings were then cleaned up manually and sprued together for a single, all at once, casting.
The wax masters were invested (surrounded) with a plaster like material in a steel sleeve called a flask. Investment set-up was about 3 to 4 hours. Then the flask was placed into a kiln for firing.
Firing is a staged process. 300 degrees to let the wax melt out, then slow rise to 1350 degrees and held for the three hours burn out. Next the temperature is permitted to drop to 900 degrees where it remains until casting. It is a 12 hour process of firing.
The silver is melted by torch while the flask has a vacuum pulling on the investment from the bottom side opposite the pouring side. The actual cast (pouring) is just a second or two long. This cast required about 86 grams of silver, about $52.00 at my cost. Some silver will be recovered from the cut off sprue and used in the next cast.
After quenching the very hot flask in cold water, the cast silver is freed from the investment. The hot quench literally blows the investment into a fine slurry, freeing the cast. It makes a very exciting rumbling boiling sound. An exciting part of the process.
The silver is almost black from fire scale (oxidation) coming straight from the quench. Remaining investment is cleaned off the casting by hand (toothbrush) and by ultrasonic cleaning.
Then the casting is put in a hot water/acid “pickling” bath for about 30 minutes. The black fire scale turns to bright white which is the natural color of pure silver.
The sprue is cut off and hand finishing progresses from here. Filing, then polishing the silver to a mirror like shine or multiple other finish options. One of my favorites is blackening the background with a sulfer based acid. I have also used fired glass enamel which is another complex process of its own. These tags are polished up shiny and will develop an aged silver patina from use.
Final step was a couple of hours in the steel shot tumbler which burnishes and creates a hardened surface.
This is an example of my custom work. As I think I have shown, it is a very complex multistep process.
The value of silver is an easily priced commodity. There are many other consumable materials that add to the cost and value. Such as the wax and investment and electrical power needed to run the kiln. Tools wear out and require replacement. I try to make more than a single item at a time to share consumable costs.
The three tags are worth at least $150 retail, $50 each. They are one of a kind (well, three of a kind) and are custom made. Solid Sterling silver makes them much more intrinsically valuable than the single copy 3D printed in plastic. At least I think so…
 |
 |
| Original design 3D printed black plastic 150 uM layer height | Design CNC machined in Green casting wax, double sided |
 |
 |
| Comparision of 3D print and Wax Master model. | Three tags double side, milled in wax, and sprued for casting in silver |
 |
 |
| Tags inside steel flask. Ready for investment | Flask filled with investment. Next step 1350 degree 12 hour firing in kiln. |
 |
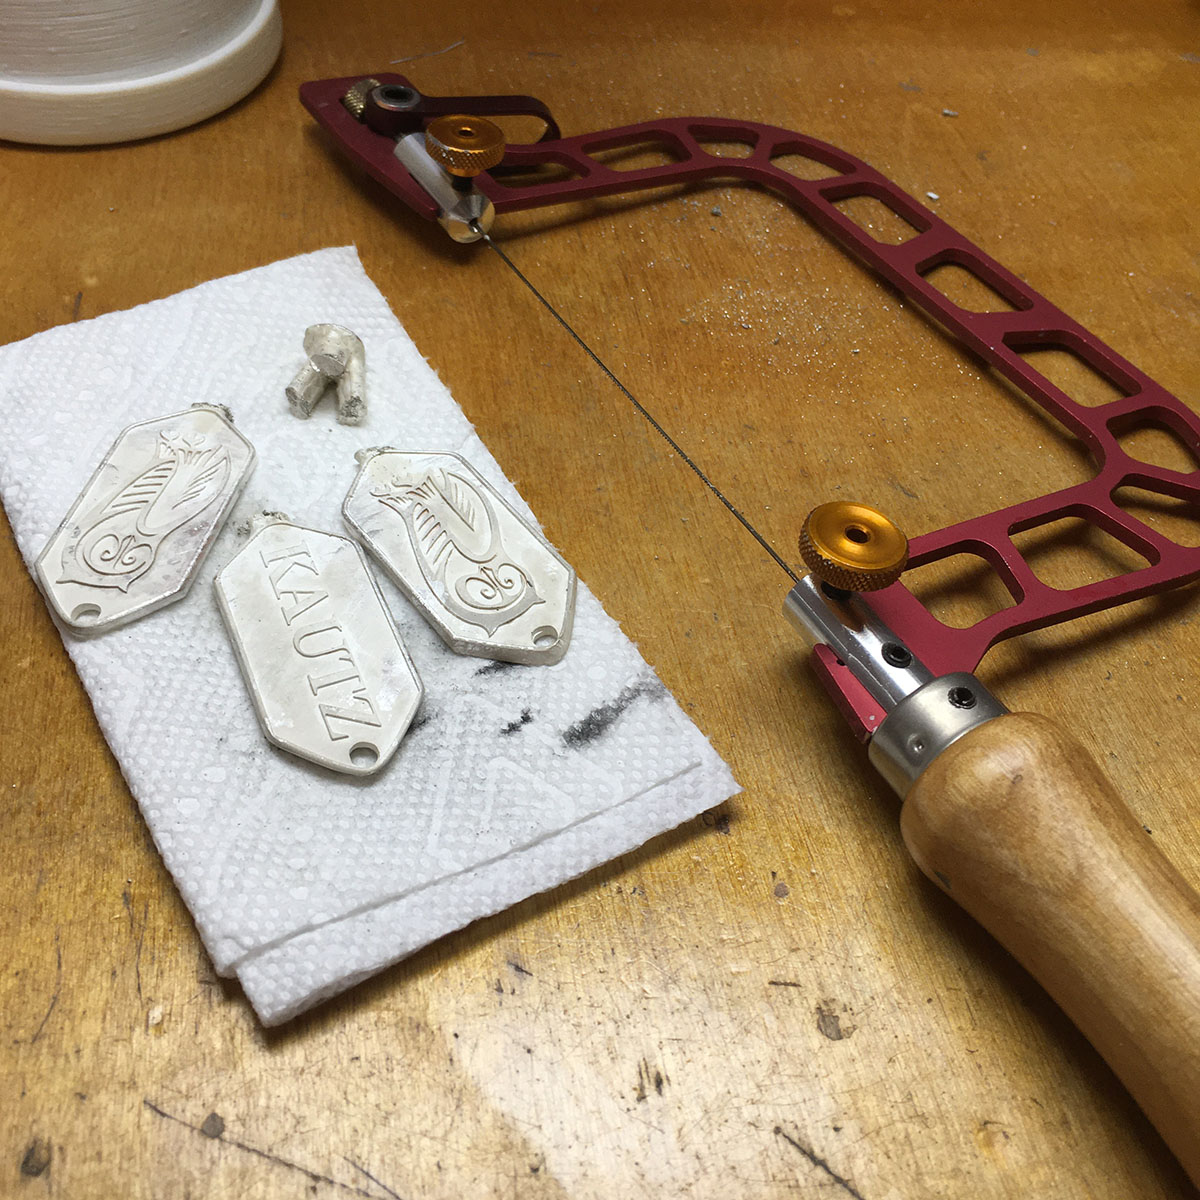 |
| Castings out of flask and after initial "pickeling" in mild acid. | Tags cut from sprue using jewelers saw. |
 |
|
| Tags finished with high polish! |
Quilter's Pendant
My wife, Gloria has her hobbies. The main one is certainly her quilting avocation. We could probably sleep every night of the year under a different quilt. Well, that might be an exaggeration, as I have never counted them, but she does have a passion for making lots of them. It's also a social gathering for her and her quilting buddies. They are all female, but there is no reason a male couldn't enjoy this sewing art as well.
The ladies gather in "retreats" where they spend a few days in secret hide-outs doing their sewing thing. As far as I know there are no men invited. :)
Gloria likes to give away some of my three dimensional printed objects as little gifts at these gatherings. The last item was a drink coaster with a quilting design called a square in a square in a square. Evey quilter knows that basic design pattern in their quilting work. I thought it was a good idea for a design quilters would recognize.
I designed a suitable coaster in Fusion 360 and was soon busy making a big pile of them (see pictures).
After the retreat, I was searching for ideas for creating a lost wax cast silver pendant design. There was an obvious conclusion. A pendant with the three nested squares is a perfect jewelry accessory for a quilter. It's a simple design and a recognizable symbol to them. It is also a good conversation topic starter to explain to a non-quilter what it represents.
Back to Fusion 360 and a new square drawing. The pendant needed to be small. I chose a one inch square as quilts are produced to inch measurement. The CAD drawing is metric though, because I intended to three dimensional print the master model. 3D printers almost exclusively use the metric measuring system for the materials as well as the print designs.
Being well practiced in both measurement systems, it is no issue to use either or both. It is the way it is today.
The bars in the design are designed to be 2 MM wide and the pendant is 3 MM thick (and 25.4 MM or 1 inch square).
I try very hard to use three dimensional printing with my silver work. It should be a natural fit, but there have been issues with the castable resin used to create the model. It has to burn out of the mold as clean as the standard wax model. That has been a very long learning path. It does work when all the production methods and secrets are known, and a rigorous process strictly followed. That's a story told in previous posts.
I will continue with both wax carving and 3D prints for my silver work. Each has it place.
I produced the green plastic example as a proof of concept to show my "boss" (Gloria). It was quickly produced on a FDM fllament type printer. It is a low resolution prototype.
Resin DLP 3D printing (by UV light) requires a lot of design effort in supporting the model for printing. Not necessary for FDM printing and the reason for doing the FDM print first.
AS it turned out, the first DLP print was what I can only call a disaster. My supports were inadequate and only one resin pendant survived. As I said above, resin printing is a bit of a challenge to get right. A re-think and a re-design of my supports and I was able to produce three high quality resin master models on the next try.
The printing is the first step. It is working well now that I have the correct resin and I don't make poor support designs. The really big issue has been getting clean cast silver from the burnout. Many of the resins tried and the process variables (trade secrets) are incorrect for the low cost equipment used by me and most other low volume craftspeople. But as you can see, it can be done. Much learning by failure is required as what doesn't work becomes a learning experience.
Happy days are here and the silver pendants are examples that printing master models will continue at KautzCraft.The pictures tell the story.
 |
 |
| The coaster design rendered by Fusion 360 | FDM prints very well and in many colors |
 |
 |
| As shown, I may have gotten "carried away" a bit. Note: They are shown on a table quilt! | The pendant design as renderd by Fusion 360. Same as iused in the coasters. |
 |
 |
| The "proof" rendered on a FDM "filament" printer. One inch square. | The second and fully successful castable resin print from The Wanhao D7 printer. |
 |
 |
| There is a rigerous post process that must be followed to ready these models for casting in silver | Freshly cast. The red models have been vaporized in 1350 degree kiln heat and the silver takes its place in the pouring of the cast. |
 |
 |
| The buttons are at the top of the mold and the silver flows down into the pattern space. | About an hour a piece to finish the pendants to this level. Ready for display. |
3D Print Result
I have succeeded in producing a fairly good cast ring from a 3D print master model. This came after many failed and unsatisfactory attempts. There have been numerous issues but the hardest one to overcome has been the failure of the investment during the model burnout. The resin from the model apparently doesn't totally cure. Especially in a thick section model. The uncured resin combines with or attacks the gypsum in the investment during the investment cure and subsequent burn-out.
I found a written article published over two years ago that confirmed every one of my suspicions. A jeweler in Bellingham, Washington, Jim Binnion (https://mokume-gane.com/about/jim-binnion/) offered a solution. It involves high vacuum curing the model in a heated oven, after ultrasonically cleaning it in water, fresh off the printer. No alcohol is used on the model and a UV cure isn't necessary either.
Jim is a professional jeweler and has professional grade equipment. I assembled a hobbyist grade equivalent, seen in the following pictures. I can't get or measure the 10 micron vacuum Jim recommends. I did notice the vacuum stop at one level, then about an hour later it dropped anotherl .5 inch WC. An indication there was gassing off of the tiny model, which created the drop in negative chamber pressure. I was heating the chamber to 180 degrees Fahrenheit. There was also some condensation (resin?) on the clear and cool lid of the chamber during the vacuum operation.
This ring is one of my best 3D printed casts so far. So, it looks like Jim's information about using a vacuum was good and I am on the right track to good casting. I will continue using this method. I have also resigned myself to keep the model section as thin as possible. The thicker the model the harder it is to properly cure.
 |
 |
| This is the ultrasonic cleaner I use to clean the model and many other things. | After the cleaning, the model is placed in this heated chamber and a vacuum is pulled. I let it run about 2 hours. |
 |
 |
| This is the ring after it came out of the vacuum chamber. | The sprue is wax. I also touched up a few blemishes on the ring using repair wax and a heated, wax pen. |
 |
 |
| The results after kiln firing and casting | The ring following the usual after-casting clean up process and shining. |
 |
 |
| The ring is quite small. I call it Pave' less the Pave' | 3D printing does work when you learn the trade secrets. It is not an easy process. |