Feeling frustration over the huge mountain of low value plastic JUNQUE I have printed has moved me back to my previous passion of wax carving and lost wax casting durable silver items.
I have made a very serious attempt to use 3D printing to create masters for use with silver casting. Much of that effort is shown here is this "lost wax" category. The inherent layering and complex chemical reactions in the casting and burn out proved to be far too complex for the results obtained. Some success, but several magnitudes of effort over the pure lost wax carvng process. The variable results were far from dependable or as consistant as wax.
The use of wax is also a complex process but provides extremely dependable results every time. The movie shows the CNC milling of the wax.
I developed some good CAD skills in designing 3D printed items. The very popular Autodesk Fusion 360 (F360) was the starting point for this project. But not the only software tool used. Vectric Aspire provides a very comfortable, easy to use, double side and 4th axis milling CAM. Aspire was used in this project as well as F360.
Not used here but I should mention another CAM that is good for CNC milling 3 and 4 axis. a product from the Netherlands called DeskProto. I own the hobbyist multi-axis version 7. Not an intense CAD as F360 or Rhino, but a get-the-job-done for CAM
This is about milling wax and silver casting a KAUTZ key fob with an owl design.
I originated the design using Fusion360. Creating the tag shape and size. The KAUTZ lettering was done in F360.
I used Aspire to create the owl, then imported the owl into F360 as a .dxf file. The complete CAD design was finished in F360.
Finally, I exported the key fob file as a stereolithographic (.stl) file and made a single 3D print in black plastic.
I returned to Aspire and imported the key fob as a 3D model (the .stl file) and used the Aspire double sided CAM to locate the key fob model in the middle of my wax carving block. Then I exported two CNC gcode files, one for each side of the wax block. The carving would be accomplished using a tiny 0.005 inch tapered end mill in my Taig milling machine, to which I have installed a 25,000 RPM water cooled spindle.
Three key fobs were carved from the wax requiring six milling operations. Two per key fob, once on each side. Run times were about 90 minutes per side.
The wax carvings were then cleaned up manually and sprued together for a single, all at once, casting.
The wax masters were invested (surrounded) with a plaster like material in a steel sleeve called a flask. Investment set-up was about 3 to 4 hours. Then the flask was placed into a kiln for firing.
Firing is a staged process. 300 degrees to let the wax melt out, then slow rise to 1350 degrees and held for the three hours burn out. Next the temperature is permitted to drop to 900 degrees where it remains until casting. It is a 12 hour process of firing.
The silver is melted by torch while the flask has a vacuum pulling on the investment from the bottom side opposite the pouring side. The actual cast (pouring) is just a second or two long. This cast required about 86 grams of silver, about $52.00 at my cost. Some silver will be recovered from the cut off sprue and used in the next cast.
After quenching the very hot flask in cold water, the cast silver is freed from the investment. The hot quench literally blows the investment into a fine slurry, freeing the cast. It makes a very exciting rumbling boiling sound. An exciting part of the process.
The silver is almost black from fire scale (oxidation) coming straight from the quench. Remaining investment is cleaned off the casting by hand (toothbrush) and by ultrasonic cleaning.
Then the casting is put in a hot water/acid “pickling” bath for about 30 minutes. The black fire scale turns to bright white which is the natural color of pure silver.
The sprue is cut off and hand finishing progresses from here. Filing, then polishing the silver to a mirror like shine or multiple other finish options. One of my favorites is blackening the background with a sulfer based acid. I have also used fired glass enamel which is another complex process of its own. These tags are polished up shiny and will develop an aged silver patina from use.
Final step was a couple of hours in the steel shot tumbler which burnishes and creates a hardened surface.
This is an example of my custom work. As I think I have shown, it is a very complex multistep process.
The value of silver is an easily priced commodity. There are many other consumable materials that add to the cost and value. Such as the wax and investment and electrical power needed to run the kiln. Tools wear out and require replacement. I try to make more than a single item at a time to share consumable costs.
The three tags are worth at least $150 retail, $50 each. They are one of a kind (well, three of a kind) and are custom made. Solid Sterling silver makes them much more intrinsically valuable than the single copy 3D printed in plastic. At least I think so…
 |
 |
| Original design 3D printed black plastic 150 uM layer height | Design CNC machined in Green casting wax, double sided |
 |
 |
| Comparision of 3D print and Wax Master model. | Three tags double side, milled in wax, and sprued for casting in silver |
 |
 |
| Tags inside steel flask. Ready for investment | Flask filled with investment. Next step 1350 degree 12 hour firing in kiln. |
 |
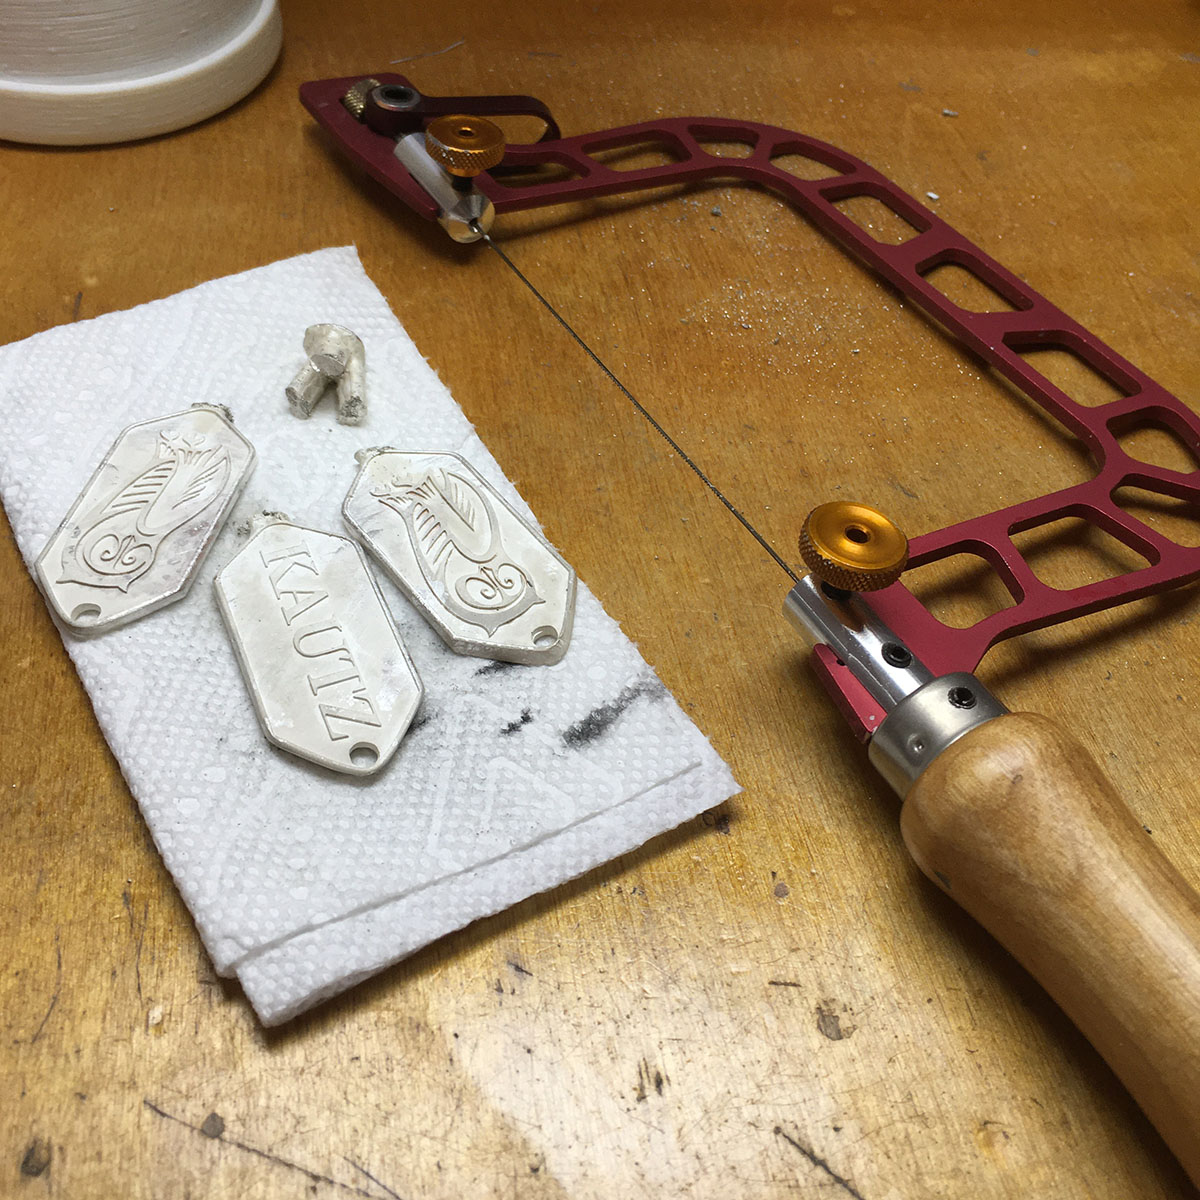 |
| Castings out of flask and after initial "pickeling" in mild acid. | Tags cut from sprue using jewelers saw. |
 |
|
| Tags finished with high polish! |